
| TOC > The interface > The selection GUI | Previous | Next |
2.2.2.1.1 Save
2.2.2.1.2 Load
2.2.2.1.3 Define SOHO/Earth Instruments2.2.2.2.1 Calibration
2.2.2.2.2 Filters
2.2.2.2.3 Projection coordinates
2.2.2.2.4 Visualization Enhancement
2.2.2.2.5 Display Order
2.2.2.2.6 Differences
2.2.2.2.7 Masking
2.2.2.2.8 Colour Palette
2.2.2.2.9 Grids
2.2.2.2.10 Overlays
2.2.2.2.11 Search Directory Options
2.2.2.2.12 Search Options
2.2.2.2.13 System
2.2.2.2.14 Auto display
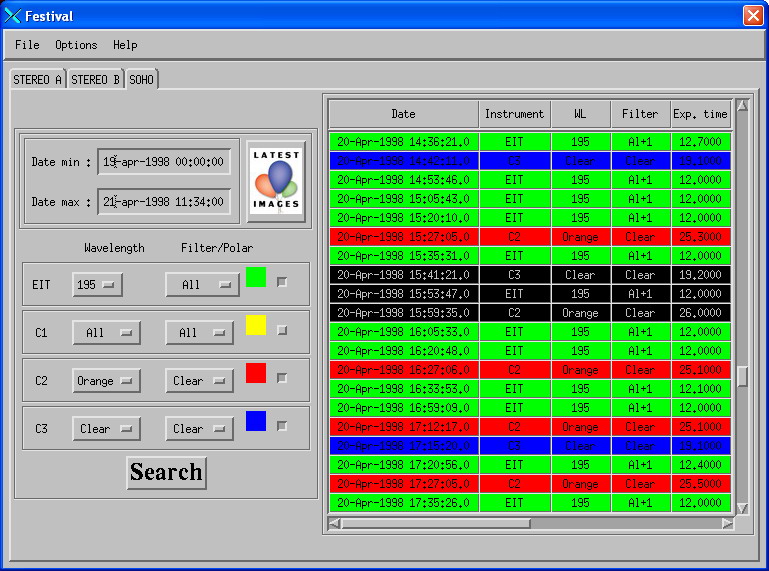
In the selection GUI, you make selective searches and you configure the behavior of FESTIVAL in the options menu. The selection GUI contains three nearly identical tabs. Each of the three tabs is associated with a probe: STEREO A, STEREO B, and SOHO.
In each tab, you have on the left an area were you select your search criteria. On the right is a table that summarizes the result of the search. Before you start a search, you must enter a start and an end date. By default, the start date is the beginning of the current day and the end date is the current date. Most date formats should be accepted. You select the instrument(s) of interest by clicking on the colored boxes. By default, none is selected. The drop lists let you chose the wavelength or polarizer/filter of interest.
The easiest way to search for recent data is to click the Latest Images button:

For the current probe, this will search for the last 48 hours of data available on your computer, for all instruments, all wavelengths and all filters. Additional search options are available from the options->search options GUI.
The menu bar of the selection GUI lets you access to a variety of optional parameters to customize the behavior of FESTIVAL. Several menue are accessible via keyboard shortcuts:
| Menu | Keyboard shortcut |
| Filters | Shift + F |
| Visualization Enhancement | Shift + E |
| Differences | Shift + D |
| Masking | Shift + M |
| Colour Palette | Shift + C |
| Grid | Shift + G |
| Overlays | Shift + O |
Here you can save the current status of FESTIVAL. The current status can be saved either as the default configuration, in which case it will be loaded as such at the next start of FESTIVAL. Or you can save it as a user configuration that can be reloaded when need. Basically all parameters are saved:
The current result of your search and the data displayed in the visualization GUI(s) are NOT saved.
Here you can reload a previously saved configuration file. You can either reload the default configuration file or a user configuration file. Although it is possible to load a configuration file at any time, we recommend that you load a configuration file before making any search or at least before visualizing any data. Otherwise, the loading operation is very slow and may have unexpected results.
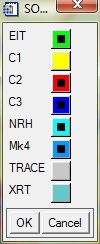
Starting with version 2.1, FESTIVAL is able to manage data from other probes on the Sun Earth line than SOHO. The first on the list is the Nancay Radio Heliograph. Since the list of supported instruments will grow in the future, the user can now chose from a list which instruments he wishes to work with. You can of course work with all possible instruments but if for example you never work with LASCO C1 data, then just unclick C1 in the list and options referring to C1 will never appear in any of the GUIs in FESTIVAL.
From the options menus you can customize the way the data are handled.
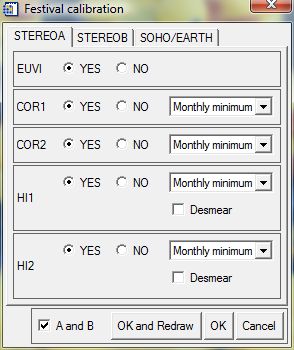
By default, calibration is ON for all the instruments. The calibration options are different for each instrument.
SOHO
EIT: with the calibration ON, the full photometric calibration is applied to the images. With calibration OFF, only the offset subtraction and the exposure time normalization are applied. The flat-field and photometric calibrations are not applied.
LASCO C1:
LASCO C2: with the calibration OFF, the photometric calibration is applied, but no dust corona model is subtracted from the images. With the calibration ON, you can also remove a model of the dust corona. You have the choice between:
- No model
- Any year monthly model
- Monthly model
- Overall yearly model
the default is "Any year monthly".
LASCO C3: same as for LASCO C2.
SECCHI
EUVI: with the calibration ON, the full photometric calibration is applied to the images. With calibration OFF, only the offset subtraction and the exposure time normalization are applied.
COR1:
COR2: with the calibration OFF, no calibration is applied. With the calibration ON, the full photometric calibration is applied to the images. You can also remove a model of the dust corona. You have the choice between:
- No model
- Monthly minimum model
- Daily median model
the default is "Monthly minimum ".
HI1/HI2: The desmear toggle can me used to turn ON or OFF the desmearing of the HI images. Desmearing is slow, so the default is not to desmear.
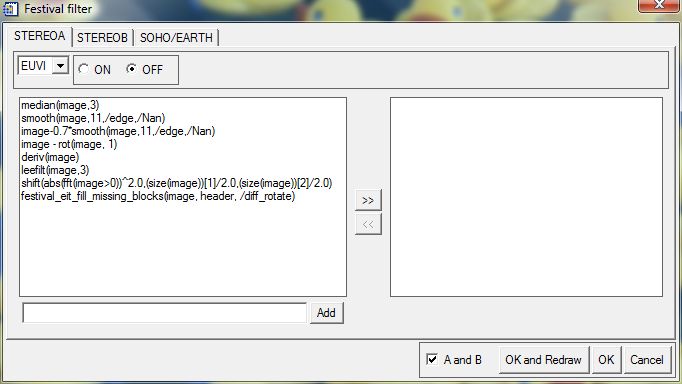
A large variety of filters can be applied to the data. A filter is any IDL function, either built-in or user-written. The left hand side in the GUI contains the list of available filters. A list of default filters appears in the FESTIVAL filter GUI. Additional filters can be entered in the text field. The right hand side contains the list of applicable filters. They can be transferred back and forth with the left and right arrows. The filters listed in the right hand side are applied sequentially. This lets you apply any number of filters in series. This series of filters is applied if the ON radio button is checked.
The projection coordinates menu lets you chose the way the data are mapped in the composite image of the sky.
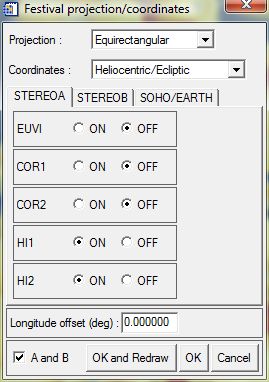
First, for each probe, you select the type of projection that you want to use for the composite image. Of course the projection type applies to all the instruments of a given probe. Supported projections are:
Considering that the outer edge of the HI2 field of view is at 90 degrees from Sun center, a half hemisphere is projected in the visualization GUIs, not the whole sky. Then, you have the choice between two coordinate systems:
The default is ecliptic north up for STEREO A and B data, and solar north up for SOHO data. This is because the STEREO spacecraft are nominally aligned to ecliptic north while SOHO is nominally aligned to solar north. However, if you want to compare SOHO and STEREO data, you can set both probes to the same coordinate system and FESTIVAL will rotate the images accordingly.
The central longitude of the projection can be modified by setting a nonzero value in the longitude offset text box. If the heliocentric ecliptic coordinate system is chosen, the center of the projection shifts along the ecliptic equator. If the heliocentric solar north up coordinate system is chosen, the center of the projection shifts along the solar equator.
Finally, you can overlay a coordinate grid by turning on the grid radio button. The grid is adaptive, meaning that the grid step is automatically adjusting to the portion of the sky that you are viewing.
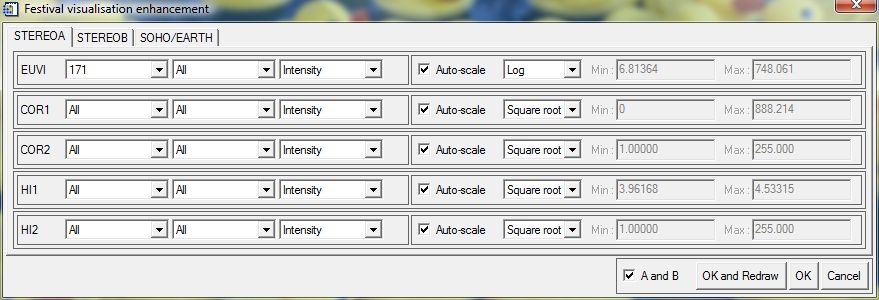
The visualization GUI was completely rebuild in version 4.0. In combination with the color palette GUI, the enhancement GUI give you more flexibility and more ease of use. For example, when using EUV images, you don't have to manually switch from logarthmic to linear scaling when going from intensity to running difference mode.
The GUI is split in two main areas. On the left side you select a combination of instrument wavelength, filter and display mode, and on the right side you select the enhancement function that you want to apply to this particular combination. This lets you define a different enhancement behavior for each combination of wavelength, filter and display mode. You can chose to display EUVI 171 images in autoscale and Log when you're working in intensity mode, and to display them in linear scale from -10 to +10 when in running difference mode. If "All" is selected in the wavelength or filter droplist on the left side, then the chosen enhancement will be applied to the selected combination regardless of the wavelength or filter.
In the display order dialog, you set the display order of the different instrument layers. The default is, from bottom to top, HI2/HI1/COR2/COR1/EUVI for STERO A & B, and C3/C2/C1/EIT for SOHO.
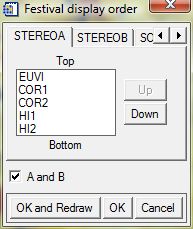
This order can be changed if you prefer to see, for example, HI2 data instead of HI1 in the overlapping area of the two instruments.
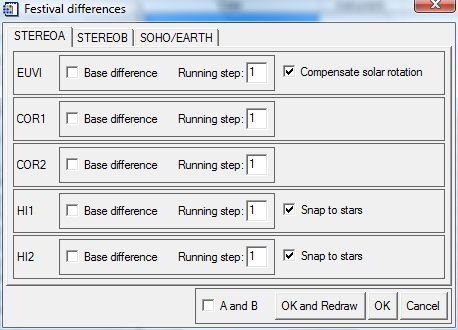
In the differences GUI, you define how FESTIVAL manages the difference images. If the "basedifference" box is checked, FESTIVAL computes base differences. The base image is always the first of the list displayed in the selection GUI. If the box is not checked, FESTIVAL computes running differences, with a configurable running step (in images). For EUVI, EIT, AIA and SWAP, it is possible to compensate for the differential rotation. For HI1 and HI2, the "snap to stars" option shifts the previous image by a number of pixel corresponding to the displacement of the starfield between the two images. With N-1 running differences, this is typically a few pixels, and since most coronal structures move faster, it does not induce too much distortion while dramatically reducing the star background residuals.
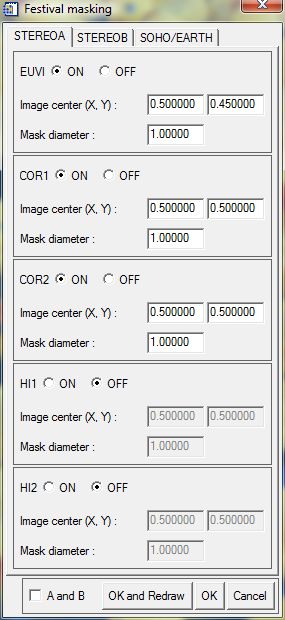
The mask GUI is where the user defines the properties of the circular masks applied to the images. If the mask is turned off, the full data is displayed. If the mask is on, a circular mask is applied. The (X, Y) position and the radius of the mask are expressed in units of image width. A mask centered on (0.5, 0.5) width a radius of 1 is circumscribed in the image.
Starting with version 2.1, FESTIVAL lets you define a different palette for each combination of instrument/wavelength/filter, visualization mode (up to version 2.0, FESTIVAL was using a palette per instrument, but not per wavelength or filter).
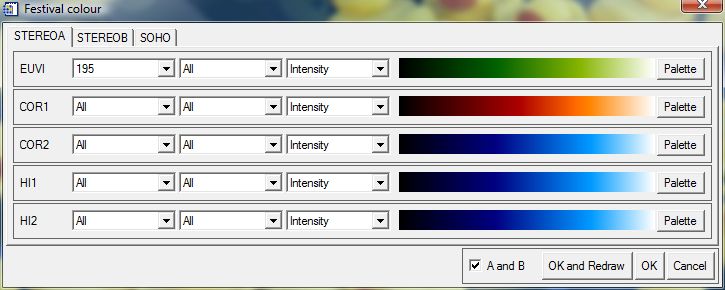
By default, all the running differences are associated to a grayscale palette. Be careful when selecting the "All" option in any of the drop lists, the current palette will be applied to the droplist without warning. If you make a mistake, click cancel and start again.
See also the enhancement GUI.
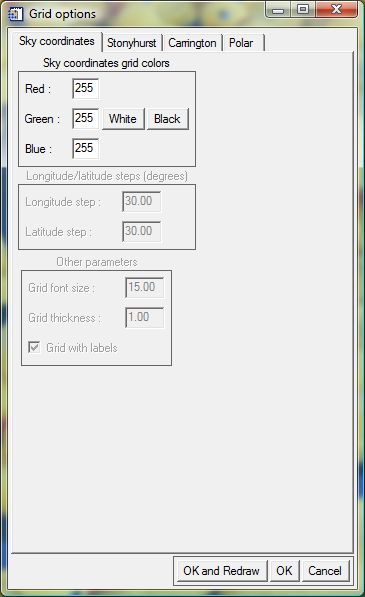
The Grids options GUI lets you parameterize the way the coordinate grids (sky, Carrington, Stonyhurst and polar grids) are displayed.
Sky coordinates options
The color of the sky coordinates grid can be changed by specifying the Red, Green, and Blue values. By default, the grid is displayed in white (255, 255, 255). Click the White or Black button to quickly set the RGB values to white or black.
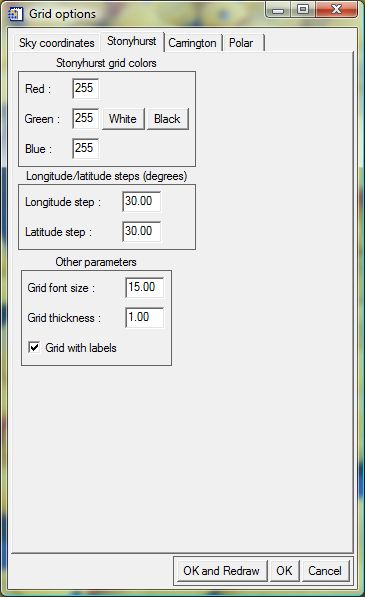
Carrington and Stonyhurst grids options
The Carrington and Stonyhurst grids have the same set of options, but they can be adjusted independently. The color can be specified in the same way as for the sky coordinates grid. The grid step size (in degrees) can be changed both in longitude and in latitude. The default is 30 degrees. A zero step size will result in no meridian or parallel being drawn, only the solar disk. You can also change the grid thickness, chose to draw or not the labels, and specify the label size.
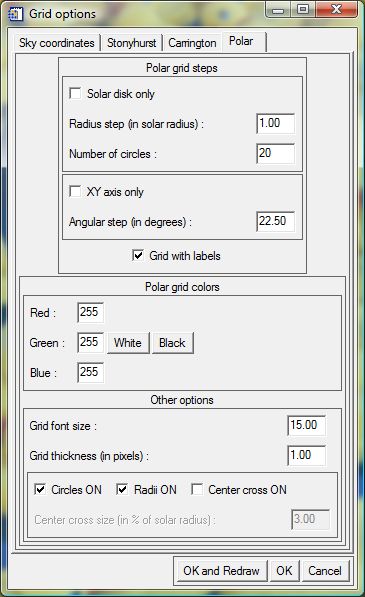
Polar grid options
The user can chose the number of circles and their spacing in solar radii, and the spacing of the radii in degrees. If solar disk only is clicked, then only the solar limb is drawn. If XY axis only is clicked, then only a cartesian XY system of axes is drawn. The drawing of circles is deactivated by unchecking the Circles ON box. The drawing of radii is deactivated by unchecking the Radii ON box. The color of the grid can be modified in the same way as the color of the sky coordinates grid. The grid font size and thickness can be adjusted. Finally, it is possible to overlay a cross at the center of the solar disk by checking the Center cross ON box. Its size can be adjusted in fraction of solar radius.
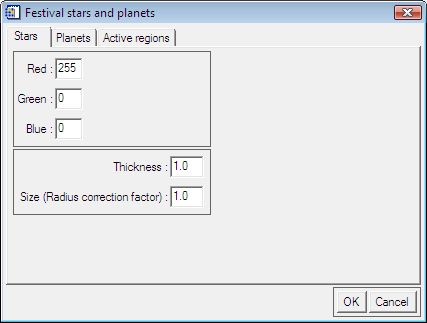
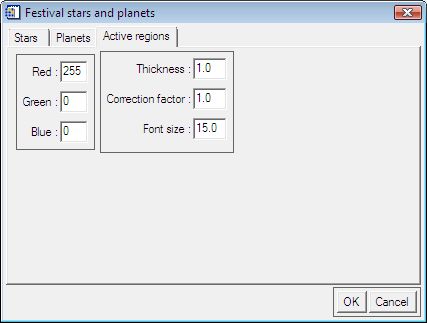
The display options for the stars, planets and active regions overlays are described below.
You can modify the color of the stars overlay by entering the red, green, blue weigths (0-255) of the desired color in the Red, Green and Blue fields. The thickness of the line and the relative radius of the stars can also be adjusted.
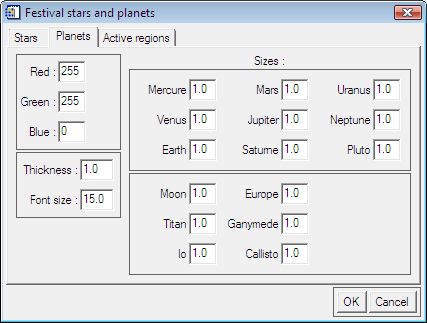
You can modify the color of the planets overlay by entering the red, green and, blue weigths (0-255) of the desired color in the Red, Green and Blue fields. The thickness of the line, the labels font size and the relative radius of each planet can also be adjusted.
You can modify the color of the NOAA active regions overlay by entering the red, green and, blue weigths (0-255) of the desired color in the Red, Green and Blue fields. The thickness of the line, the labels font size and the relative radius of the active regions can also be adjusted.
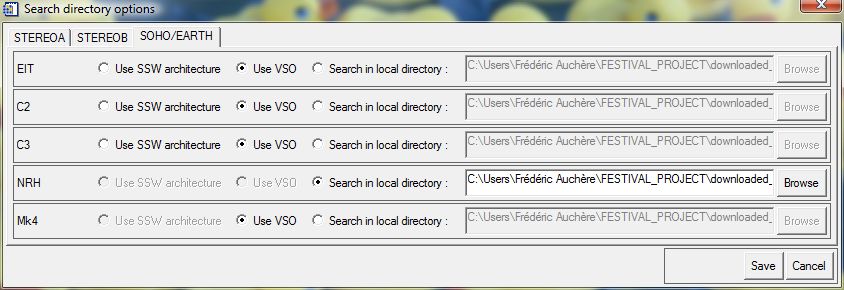
In this dialog you define how and where FESTIVAL should look for data. Three options are available:
1. Use the standard SSW architecture. For most instruments supported by FESTIVAL (all except NRH and MkIV), it is possible to use catalogues distributed in SSW or SSWDB to quickly search for data. This option requires the user to maintain its data in the standard directory structure described in the installation page.
2. Use VSO. for all supported instruments except NRH, is is possible to make the data query through VSO. This options is very convenient as you do not need to have data pre-installed on your computer to use it. The data will be automatically downloaded to the FESTIVAL_PROJECT/downloaded_data/ directorywhen you click on an query result in the selection GUI. Of course, since the data are downloaded on the fly, using VSO somawhat slows down the operation of FESTIVAL. However, FESTIVAL will not download the same data twice since it is able to remember if you already visualized a given image. The flexibility of VSO queries is limited as the wave or filter fields are not recognized or not documented by VSO for several instruments. Therefore, FESTIVAL may return data that do not have the requested combination of wavelength and/or filter, and the corresponding fields in the query results table will be filled with "Undef" or "-". These limitations may be overcome with future developments of VSO.
3. Search in a local directory. Using this option you can tell FESTIVAL to look for data that are stored locally on your computer but not organized in the standard SSW structure. This is the default option for MkIV and NRH data. Simply click the Browse button to select you local data directory. This option can be slower than using the catalogues if the number of files in your data directory is large. By default, the search is non-recursive. Recursive searches can be performed if you select the corresponding option in the system GUI.
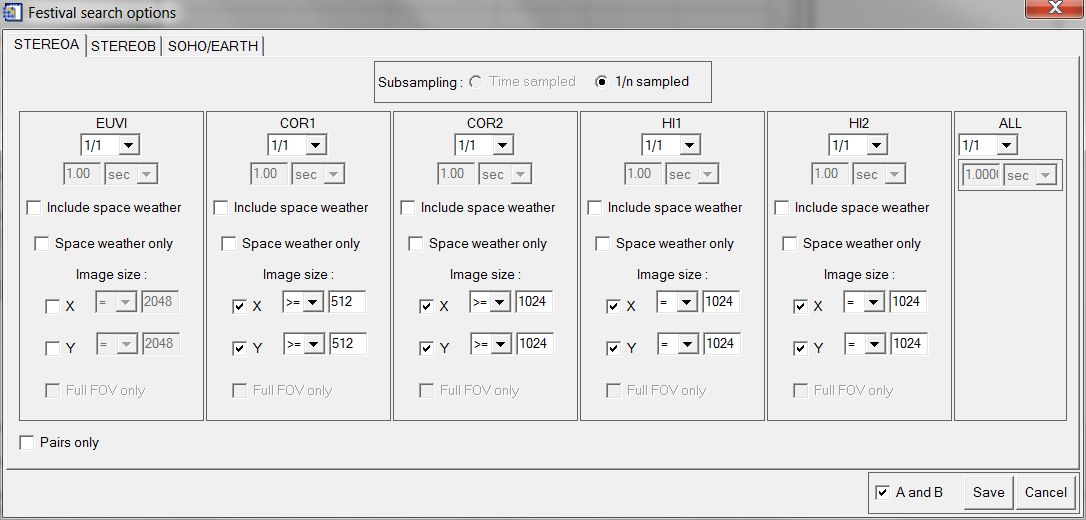
The search options dialog is where the queries can be refined .
The top droplists filter the query by returning only 1 image over N. This is useful to match the cadences of various instruments.
The "include space weather" and "space weather only" checkboxes control the way the beacon data are handled. By default, FESTIVAL does not return beacon data. If the "include space weather" box is checked, a query returns the beacon data if there are no full resolution images for the selected dates. If both beacon and full resolution data are found, only the full resolution appear in the selection GUI. If the "space weather only" box is checked, FESTIVAL uses only the beacon data.
It is also possible to select images by size by chosing a logical condition and filling the X and / or Y size fields.
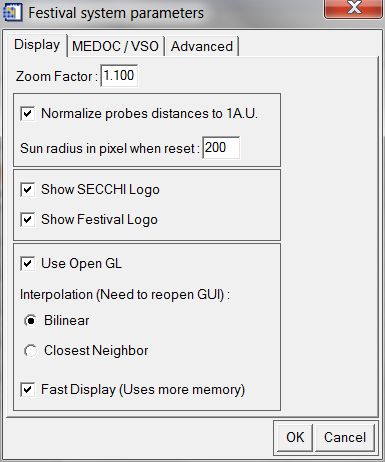
In the system GUI, you have access to several options that let you fine tune the behavior of FESTIVAL.It is composed of three tabs. The first tab (Display) groups the options that directly affect the display of images. The second tab (MEDOC / VSO) lets you tune the behaviour of FESTIVAL with respect to remote data providers. The third tab (Advanced) groups all the other options.
Display tab
MEDOC / VSO tab
Advanced tab
 |
 |
 |
When auto display is checked, the first image of each of the selected instruments is automatically displayed after a search.
Brings up the present users manual in your internet browser. Under Linux, IDL is expecting Netscape to be installed.
Self explanatory, isn't it ?